Showing posts with label DIY. Show all posts

Monday, March 30, 2015

Pinterest Win or Fail?

I am back after a long time away.  I have been very busy and want to try my hand at blogging again.  To start my first post I found this BEAUTIFUL egg wreath that I wanted to try the directions (and picture) I tried came from this blog right here http://www.wineandglue.com/2012/03/easter-egg-wreath.html  I also used some directions from http://www.craftbyphoto.com/yarn-easter-eggs/.
                                                            Easter Egg Wreath | www.wineandglue.com | A simple and easy diy!

Some of these tutorials called for Mod Podge the wreath directions called for 1/2 cup of flour and Sta-Flo liquid starch.  I did not want to purchase something I would only be using once and I did not want to waste a bunch of Mod Podge since it is so expensive.  I decided to go the old fashion route and make some old fashion glue 1/2 cup of flour and water until its the consistency of
paste.  Here are the directions I tried to follow to make my own wreath.

1.  Buy pretty pastel embroidery floss I used a combination of colors I already had and went and purchased more at Hobby Lobby.  She said 20 colors I only used about 11.


2.  Also purchase water balloons, I purchased a variety pack of balloons at Hobby Lobby and picked out the ones that were water balloon size.  Here is the size I picked out.
3.  Mix your flour and water mixture (or whatever you choose) into a bowl.
4.  Blow up the number of balloons of your choosing I placed them on a large cookie sheet covered in a piece of waxed paper.
5.  Place one thing of embroidery floss into your glue (unwrap it first and lay it gently in the bowl).  This is the best tip I received!  By doing this is prevents the floss from becoming one big knotted mess.  Gently push it into the mixture so it is all covered.
6.  Take one end of the floss (make sure you take your two fingers (thumb and pointer) and pull of the excess goop.

Now here is where I stopped taking pictures sorry!

7.  Begin wrapping around the balloon and continue pulling off excess goop.  Wrap until you have used all the floss for the roll.
8. Place on the cookie sheet and allow to dry.  I let my dry overnight I just flipped them after a few hours so the other side could dry.
9.  The next morning I gently pushed the balloon away from floss and used a pin to pop the balloon.

Now here is where it failed I also didn't get enough of the glue off and it stuck to floss:

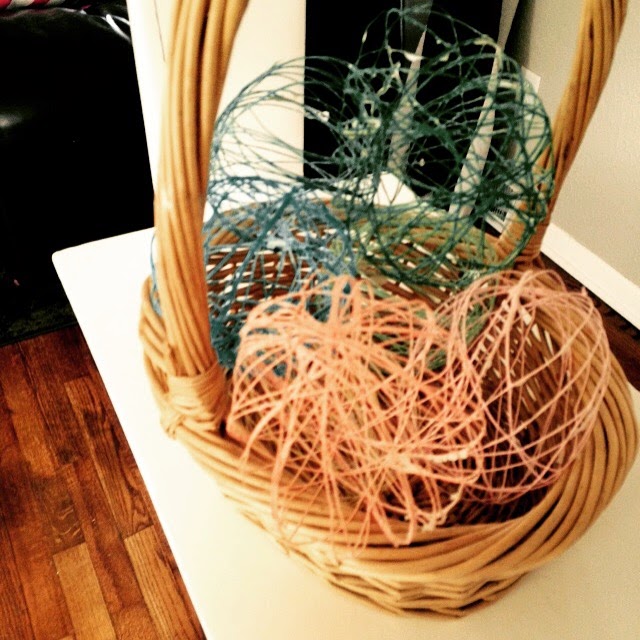
I tried to create the wreath by setting the floss eggs around a round casserole dish.  I threaded a piece of thick ribbon through each egg and then tried hot gluing the connecting edges of the eggs together.

For some reason the form of the wreath did not keep.  So instead of fighting it I took apart the glued edges. and placed my eggs in a cute basket near the door.  Overall they didn't turn out too bad and my husband even said they turned out well.


Tuesday, February 4, 2014

DIY Chevron Nails

This is the hot new trend in nail art and I have fallen in love with it since I saw it on Pinterest but have not been able to figure out how to do it myself until the other day.

Here are the steps to enjoying your own chevron nails:

1.  Paint nails (4/5) with a base coat I used this orange color.
2.  Paint the nail you left blank white.  Allow all nails to dry completely
3.  Using scrapbooking scissors I cut the stripes out of masking tape.
4.  Once nails are dry place the stripes you made on the white nail (make sure it is attached securely)
5.  Paint over the white nail with the orange color allow to dry.
6.  Gently pull off tape.
7.  Cover nails with a clear coat and enjoy :)


DIY Scarf Hanger

In case you can't tell by the end of this post I love scarves!  Until now I've been hanging them on hanger and it's a pain in the butt to get them on and off the hanger without knocking them all off .  So in comes this project to help me organize them and make it look a little nicer in the closet.


Here are some of the things you will need:

Shower rings, mine were cheap ones from
dollar tree 12 for $1 can't beat that!
Hot glue gun
Ribbon, I bought this ribbon scrap
pack from Hobby Lobby for 50% off


Here is the variety I got in the
pack and they were the perfect
length for this project!

Now here are the steps to complete this project (there are a lot I apologize ahead of time!)

1.  Grab one shower ring and a piece of ribbon
place a drop of hot glue near the clasp and glue
one end of the ribbon onto it.
2.  Wrap overlapping slightly all the way
around the shower ring.


Wrapping should look like this
no white showing.
4.  When you get back to the end
place another drop of hot glue and
continue wrapping to finish the ring


5.  Leave the tail on the ring this
will be used to attach the rings together
6.  After wrapping all the rings your
table might look something like this, and
your hands might hurt (sorry!)
7.  Cut the tails off of the rings and put the
extra ribbon aside.
8.  Arrange the rings how you want
them to look

Now comes the fun part linking
them together
9.  take one end of a ribbon tail and
glue it onto one of the rings like this.


10.  Glue the other ring on top
of where you started the ribbon
tail.
11.  Wrap the ribbon tail around
both of the rings until you feel
it is secure then secure the end with hot glue.
12.  After you have finished attaching
everything it will look something like this.
13.  I then took yarn and attached it to the hanger.

14.  Hang scarves and admire your work :)

Tuesday, January 14, 2014

Valentines Day Nails

Here are the steps to creating this design:
1.  Paint with a clear coat.
2.  Paint nails base color (in this case pink).

3.  I used Sally Hansen Nail design and cut in half for each of my nails, place on the top half.
4.  Cover remaining nails with glitter top coat.
5.  Cover all nails with clear top coat.

Here are the steps for this design:

1.  Paint with a clear coat.
2.  Pain nails base color (in this case red)
3.  Using other Valentines colors paint hearts on the nail.
4.  Cover in glitter.
5. Cover nails with clear top coat.

Nail tips


All of these nail designs have the same general idea here are the steps to recreate these:

1.  Paint nails with a clear base coat.
2.  Paint nails with any color you wish.
3.  Decide where you want the next color to be and paint the top portion of the nail that color (or do the design.)
4.  Cover the line where you started the 2nd color, with a solid color line (such as silver or black).
5.  Paint with a top coat and enjoy!


Reindeer nails


This idea came to me one day as I was thinking of how I was going to do my nails for the Christmas season.  This was a little more difficult.  Here are the steps to do it yourself.

1.  Paint your nail a background color I chose white allow to dry.
2.  Using brown paint the general outline of a reindeer on your nails allow to dry.
3.  Using a thin brush and black paint antlers on the the reindeer head.
4.  Also using the black paint on a nose.
5.  Using a dotting tool create the eyes.
6.  If you want add a red nose to make it look like rudolph.
7. Cover with a clear coat.


Leopard Print Nails

Here is a link to the pin that inspired my nails 

Steps:
1.  Paint nails with a base coat.
2.  Paint with any other you want I chose this blue purple color.
3.  Take a dotting tool and dot multicolor dots on nails.
4.  Using a thin brush and black paint small curves around the dots to create the leopard print look.
5.  Cover with a clear coat.


Turkey Nails


Here are the steps to creating your own turkey nails!
1.  Paint your base coat I used this light yellow/tan color.
2.  Using a small brush and brown paint the outline of a turkey on a nail.
Once dry take a dotting tool and white to create eyes.
3.  Using fall colors paint feathers around the turkey using red, gold, orange,
I threw in purple just for fun.
Another picture of step 3.
4.  Finish the turkey by taking a dotting tool and finishing the
 eyes and adding a beak cover with a top coat

Fall Leaves Nails

I decided to try my hands at these fall leave designs that I saw on pinterest.

Steps:
1.  Paint nails with a base coat
2.  Paint nails white (the blending will show up better this way).
3.  Paint nails a metallic orange color allow to  to dry until tacky.
4. Take a sponge and paint on it a gold color gently sponge over top of the orange to blend it together.
5. Allow to dry.
6.  Take a small skinny brush and paint a tree on each finger.
7. Paint on a clear top coat.


1.  Paint on a base coat..
2.  Paint tips of nails brown to look like the ground.
3.  Take a small brush and using red, orange, and gold, paint leaves on nails.
4.  When leaves are dry using a clear glitter coat paint over top of nails.
5. Cover with a clear coat.

Owl Nails

The school that I was student teaching at mascot was an owl to celebrate the first spirit day I tried my hand at painting little owls on my nails.

Steps:

1.  Paint a base coat on your nails.
2.  Paint your nails with your base color I used a gold color allow to dry.
3.  On two of the nails I made the outline of an owl using brown allow to dry.
4.  Using a dotting tool and a small brush make the belly of the owl and the eyes with white allow to dry.
5.  Using a smaller dotting tool make the inside of the eyes using black.
6.  Using a small brush make a triangle for the beak.
7.  Leave other nails as is or use a dotting tool to create polka dots I used purple for my other nails.
8.  Once nails are dry cover with a top coat.


Sunday, November 24, 2013

Fish tail nails

Pinterest inspires a lot of my nail ideas.  I saw this fishtail design on there one day and decided to try it.  
Click here to see the pin/tutorial for the fishtail design.

Here are two designs that I tried myself.  The fishtail is very simple you just keep layering the three colors overtop of each other.  I really like just doing one nail as a statement and leaving the rest a plain color.


Tuesday, November 19, 2013

Bat Sock Craft

This cute little bat was made during my summer at the zoo.  It was a craft that my partner and I had come up for our theme of creatures of the night.


Here are the Materials needed for this project:
Long Black Socks (use ½ for each project)
White or black foam for wings
Batting for pillows, etc.
Googly eyes

Here are the steps to make this craft:
1.  For the part of the sock that has an opening at each end hot glue one side together.  This side will be the ears.
2.  Stuff the socks with batting that is used for pillows. Until desired fill.
3.  Close up the sock with a hot glue gun.
4.  Glue on googly eyes and wings.

DIY coffee mug

I love the DIY mugs that I see on pinterest on all the time.  Here is the tutorial if you don't know how.


But I saw this UP inspired mug that I decided I wanted to try out as a gift for a friend.  Here is the pictures that inspired my UP Mug.

I followed the directions for the DIY sharpie mugs.  I used stencils to trace all the letters on one side of the mug.


Then on the other side I used lots of bright colors to show the balloons and drew a little house.  This was easy and was definitely a simple afternoon project.  The hardest part was trying not to smudge the colors!